The Art of Hanging Wall Art
You have just acquired a beautiful piece of wall art. After deciding where it will hang, the next important step to fully appreciate your new acquisition is knowing HOW to hang your art. By following the simple guidelines below you will be able to hang your art without putting numerous holes in your walls and situate it perfectly in your room for your complete enjoyment.
1. As a general rule, hang art at eye level, which is 60″ off the ground to centre of image. Using this standard will allow you to create a harmony among the pictures in your home, as they will always hang in relationship to one another from their centers, not their sides.
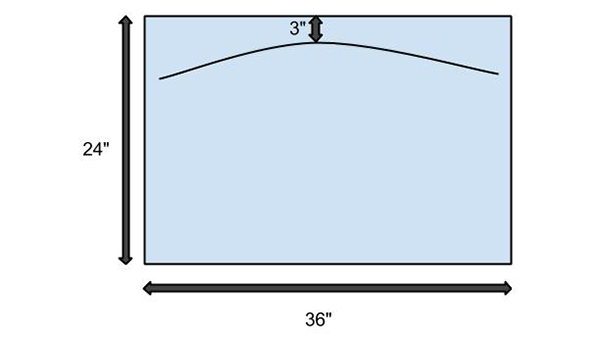
2. Measure from the top of your picture to the middle (or take the total height and divide by 2)
3. Measure from the top of your picture to the tightened wire (Place your measuring tape under the picture wire and pull it taught, measure to the top of your picture)
You have just acquired a beautiful piece of wall art. After deciding where it will hang, the next important step to fully appreciate your new acquisition is knowing HOW to hang your art. By following the simple guidelines below you will be able to hang your art without putting numerous holes in your walls and situate it perfectly in your room for your complete enjoyment.
1. As a general rule, hang art at eye level, which is 60″ off the ground to centre of image. Using this standard will allow you to create a harmony among the pictures in your home, as they will always hang in relationship to one another from their centers, not their sides.
2. Measure from the top of your picture to the middle (or take the total height and divide by 2)
3. Measure from the top of your picture to the tightened wire (Place your measuring tape under the picture wire and pull it taught, measure to the top of your picture)
4. Subtract this last amount to tell you how far above 60” your hook should go
5. Measure up from 60" with this last amount and lightly mark on the wall
6. When hanging a picture over a piece of furniture, leave 6″ to 8″ above the sofa, table, chest, sideboard or mantel.
7. A small picture over a big sofa will look awkward. A common mistake people make is hanging a grouping that is too small for the furniture under it. Plan your arrangement so that it covers at least two-thirds of the wall space. For instance, if your sofa is 7′ wide, your grouping or picture should be 5′ wide or more. Although it can be wider than two-thirds of the sofa, it should not be wider than the sofa or furniture itself.
8. Don’t hang pictures at different heights in the room. Keep them at the same level so your eye is not bouncing from picture to picture.
Example:
- Picture is 20" tall
- Middle is 10" down from top (this should rest at 60")
- Wire comes to 2" below the top
- 10" – 2" = 8"
- Lightly mark 8" above your first mark OR 68" on the wall
Deciding on a location for one picture is fairly simple, but arranging several pieces in a single space can get a bit more complicated. The answer is to make paper templates, draw a couple of arrows on the template to indicate whether the piece will be hung vertically or horizontally. Tape the templates to the wall, using easy-release painter’s tape, and rearrange them until the grouping is to your liking. Once you’ve decided on the perfect spot, use a stud finder to identify wall studs and mark their location with painter’s tape.
Once your art is hung look it at often to enjoy its beauty.
"Art enables us to find ourselves and lose ourselves at the same time."
Thomas Merton